willandmegan

"Stuart rose from the ditch, climbed into his car, and started up the road that led toward the north…. As he peeked ahead into the great land that stretched before him, the way seemed long. But the sky was bright, and he somehow felt he was headed in the right direction." (from Stuart Little by E.B. White)


Leave a comment

Oatie Nib Cookie (Oatmeal and Roasted Cocao Nib Cookies)

DSC_0469

“Oatie Nib Cookies

– 22 Good Sized Crunches of Heaven-

I love oatmeal. I love a sweet treat. And goodness, I love texture. And suddenly, I had a revelation! Why not use our crunchy, unabashedly enticing leftover cocao nibs to add just the right crunch to cookies?! (Note to readers: before editing this blog I realized I accidently wrote ‘add just the right CRUNK to cookies. These are things no one ever knows).

And thus, the oatmeal nib cookie was born! Before we embark on the recipe (and I know, if you’re like me, you’re ignoring these first few paragraph babbles) but I wanted to give a quick blog to Dandelion Chocolate out in California. While working at a local coffee shop I had the pleasure of encountering these little bits of crunchy heaven. They were so good, Will and I ordered a bag and had it sent to us in the mail. I will spare you my pretending-to-be-super-cool-on-wordpress and quote Dandelion directly on the natural flavor attributes of the bean (and boy is there!), “Our Madagascar bar’s crazy fruit notes are present even straight from the bean, but here they show an acidic bite punctuating the nuttier undertones.” So, there ya have it. And it animates these cookies in a way that no amount of walnuts or raisans can!

Ingredients:

The Big Schtuff

2 cups of oatmeal (some say quick oats, some say regular. I used regular)DSC_0909

1/2 cup of Dandelion Chocolate Cocao Nibs

1 cup wheat flour and 1/2 cup all purpose (variations of this would turn out fine)

1/2 cup ground flax (or not. or more. but it gives you some Omega 3)

1/2 cup butter (that’s a giant stick of fat thrown in a bowl & melted in microwave)

1/4 cup honey (in place of 1/2 cup white sugar)

1 cup raw cane sugar (or brown)DSC_0908

2/4 cup applesauce

1 egg (or eggwhite? haven’t tried that yet)

1 cup peanut butter chips (or whatever you want)

The Not-So-Big Schtuff

1 teaspoon cinnamon

1 3/4 teaspoon vanilla (or however much you want it to taste like vanilla)

1/2 teaspoon of apple pie spice (which really means some clove or nutmeg or allspice or pumpin or or or)

1 teaspoon baking soda

1 teaspoon baking powder

1/2 teaspoon salt

Directions:DSC_0931

1- Preheat to 375 (I preheat to 389 because my oven hates me)

2- Grease a cookie sheet or use a super cool silpat

3- Big bowl for the dry stuff: oatmeal, flour, baking soda & powder, salt, flax, spices<–StirDSC_0930

4- Not as big bowl for the ‘wet’ stuff: butter, brown sugar, vanilla, honey, egg, applesauce<–Stir

5-Drop wet stuff into dry stuff and mix

6-Drop them on your baking sheet, however big you want (I made 12 1st round, 10 the second)

7-Service with Almond Milk.

8-Eat them all in one day.

Seriously, the best. I’m gonna fatten’ up William Head.

Cheers,

willandmegan


2 Comments

SHAKE IT UP – Organic Shamrock Shake Recipe

shamrock presentation edit

On Saturday March 9th we spent the day still basking in the pride of a successful homemade wine tasting from the night before. By one o’clock our hunger brought us to Wegmans for food items, mint leaves and coconuts. After the sadness of realizing organic coffee was $11.00 finally subsided, we decided to pass on that purchase. With the fridge stocked heavily Meg and I brushed off the lack of french press and became excited for the preplanned frozen treat that was in store.

Items you will need:

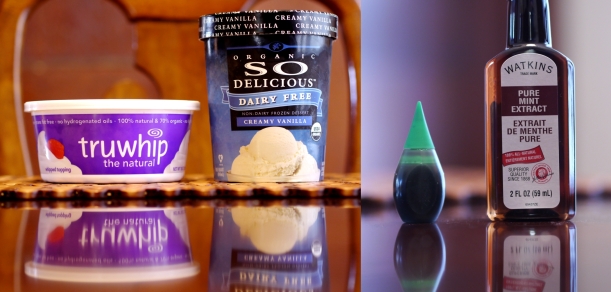
dye. flavor. ice cream

Ingredients:

  • 1/3 cup Organic Almond Milk
  • 1 cup Organic Vanilla Ice Cream
  • 1/2 – 1 teaspoonNatural Mint Extract
  • Tru Whip Natural Whipped Topping (optional)
  • 4 drops Green Food Coloring (optional)
  • Alter Eco Mint Chocolate Bar (optional)
  • Mint Leaf Garnish (optional)
  • Organic Cane Sugar (optional for rim of glass)

Directions:

1- Prepare rim of glass ahead of time by dipping in water and then in a bowl of green colored sugar. Wait for milkshake.

2- Mix ice cream, milk, extract, and green food coloring in blender. (1/2 a bar of Alter Ego Dark Mint Chocolate for delicious, crunchy affect).  Mix until creamy.

3- Pour into glass carefully to avoid ruining the rim

4-Place a few dollops of whip cream in the center.

5-Shave off a fair amount of Alter Ego Dark Mint Chocolate on top of the whip cream.

6-Add mint leaf for garnish.

alter eco mint display edit

Cheers,

willandmegan


Leave a comment

Lemon Chili Chocolate Pasta

Image

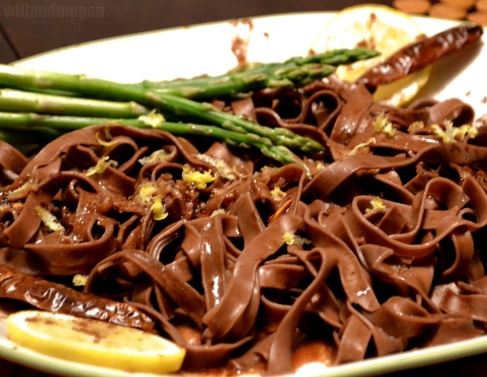
The other night, I decided to dig out the pasta I had bought from my trip to Venice two summers ago. It had sat there, not for lack of want or even because it was a novelty, but because I could not figure out what to do with it. I mean, let’s be honest. If you read “Chocolate Pasta” what sauce comes to your mind?! Red sauce, gross. Alfredo, weird? Oil and butter, boring. So…apparently I needed two years to mull it over in my head. And then I just thought… spicy and sour! And it was delicious!

Ingredients

  • .5 pound of chocolate pasta (local stores/online/or use it as an excuse to travel to Venice!)
  • 2-3 tbs Butter
  • 1 lemon
  • Local and organic honey
  • 2 1/2 whole, dried chilis
  • 100% unsweetened natural cocoa powder (I use Scharffen Bergen)
  • Asparagus

Directions

  1. Bring water to a boil
  2. While water is heating up, start the base for sauce. Begin melting 2-3 tbs of butter in a pan.
  3. Slice 2 slices off of the lemon before using it for juice. Set aside to garnish dish for later.
  4. Combine 2 tbs honey, 1/4 cup of freshly squeezed lemon juice, and 2-3 tbs of honey.
  5. Warm up and mix. Take 1/2 dried chili and crunch between your fingers. Allow some (but not a lot) of the seeds to drop into the sauce. You will want more of the outside chili.
  6. Add some lemon zest from the squeezed lemon and a teaspoon of cocoa powder. Save some lemon zest to place on top of the dish.
  7. Mix and let sit for another 3 minutes.
  8. When the pasta is finished, place some sauce on the bottom of the plate. Add pasta to dish and sauce on top.
  9. Place 2 slices of lemon and 2 whole dried chilis on the side of the plate for garnish.
  10. Sprinkle some cocoa powder on top.
  11. Pair with some lightly steamed asparagus and enjoy!

Will and I decided it tastes like a spicy lemon head! Let us know what you think.

xoxo,

willandmegan

Image


Leave a comment

Homemade Concord Grape Wine (Ode to Autumn)

I am looking for someone to share in an adventure that I am arranging, and it’s very difficult to find anyone. 

(from The Hobbit by JRR Tolkien)

This is not true with William. We are both never lacking in an adventure together. At any given point in our week, we both have several projects we would like to see happen or different ideas we are shooting back and forth with each other. While it can be exhausting sometimes to keep up with yourself, it’s always nice knowing there’s a partner out there wanting to adventure with you.

This weekend we set off to the beautiful lakeside house of a family I know. They had acres of concord grapes, there was a bright blue sky, and plenty of grapes to be found.

We spent an hour or so exploring the few acres full and ending up picking around 20 pounds of grapes.

As I’m typing, I am still not sure our fermentation has started, or will ever start, but in the meantime I plan on celebrating the process that is wine making with a blog!

Step 1: Pick ‘Em

  • Pay careful attention to the cute ‘beauts you may find buzzing around the vines.

Step 2: Separate Grape From Stems

  • Be sure to have a drink while you’re doing all of this!

Step 3: Weigh ‘Em

  • We just used my home scale weighing ourselves first, then holding the bag. Not the most scientific method but it works!

Step 4: Mush ‘Em!

  • This part is fun.
  • This part is messy.
  • Hold hands in the grapes.
  • Know ahead of time whatever touches this mush will itch like you’ve been rolling around in installation.

Does anyone know why the heck this happens?!

Step 5: Add Campden Tablets

  • Wait overnight to let these beauties work their cleaning/clarifying magic

Step 6: Dump Must (Juice & Skins) Into Primary Fermentation Container

  • We initially mushed them in my old pot I cook meatballs & pasta in (shown in Step 4) before we transferred them
  • We used a funnel (AKA cut drink container) to dump them into a glass carboy (done in my tub, for the record!)

Step 7: Add the Yeast

  • We used wine yeast
  • Make sure not to use hot water while you let the yeast rehydrate
  • Be careful not to let it sit longer than the package recommends (for ours, 15 minutes)

Step 8: Shake Vigorously

  • Seriously, Will got a workout…try to do this as long as you can to ‘incorporate oxygen’

Step 9: Put the Airlock on Top & Pray For Bubbles

  • We don’t have them yet, but I’m hoping!

Step 10: Wait Patiently for Fermentation to Start

  • Not. I am freaking out and checking it every other minute like a paranoid mother. I convince myself at times there’s a glimmer of hope and I see a bubble on top of the must. Mostly, nothings happening….yet? 🙂
  • Don’t store in direct sunlight

xoxo,

mp


Leave a comment

Hardy Harvest Orzo & Venison Dish

Sunday mornings William and I have a tradition; Morning Market Shopping.

Although Woody Allen would mock me by saying, “Tradition is the illusion of permanence”, I, for one, love them. Nothing is better than walking around the bustle of a Farmer’s Market with Joe Bean Coffee steaming from a mug in your hand and colorful and palatable possibilities at every stand.

Today, I came home and watched Fast Food Nation. While I’ve seen a dozen documentaries on the depressing state of our nation when it comes to consuming food and other goods, this one still left an impression. Albeit humorous, it highlighted a lot of critical down falls. Without getting out a soap box, I just want to post an “Ode to Local” meal post.

This dish was one that is easy, doesn’t take a lot of prep work, and is super filling. Will and I used venison from a deer that his Dad shot last season, colorful organic pasta from a local artisan pasta maker called Flour City (this was the Mushroom, Saffron, Spinach, and Cayenne Bon Vivant Orzo) and  a lot of produce from a local Farmer’s Market.

What You’ll Need:

  • 1lb. of Venison
  • .5 lb. Orzo Pasta
  • Green Bell Peppers (Or make it colorful!)
  • 2-3 Carrots
  • 1 Medium Onion
  • 1 Tbsp. Corn Starch mixed in 1/4 c. water
  • Sriracha
  • Ketchup (Some are made without HFCS)
  • 1/8 c. Soy Sauce
  • Organic Better than Bouillon Beef Base
  • EVOO
  • Salt (We used Simply Organic Grinder Salt)
  • 1-2 Tbsp. olive oil

Instructions:

1.) In a skillet, brown the steak (half inch strips work well), onion and pepper in oil.

2.) During this process start your chopped carrots in a pot of water to boil on the side.

3.) Add seasoning salt to your skillet and cook for 5 minutes.

4.) Now add bouillon beef base, ketchup, sriracha making sure steaks are thoroughly covered. Cook another 5 minutes.

5.) Strain your chopped carrots. We used the boiling water to start cooking our 1/2lb. of orzo at this time. Add carrots to the pan along with the cornstarch water mixture and soy sauce.

6.) Cover and simmer until meat is tender. approx. 10-20mins

7.) Remove your cooked orzo and strain from water. Add any seasonings or sauces your prefer.

Note: We chose to display our two dishes separate and garnish with a red pepper/herb leaf. If you care to go the extra mile and cleanse your palette, this meal goes wonderfully with the thick, roasted pumpkin and nut flavors of Festbier from Victory Brewing. Enjoy!


Leave a comment

Upcycled Burlap Beanie

Burlap, flannel shirt scraps, thread, plastic co2 filter “button”

If you’re into upcycled clothing and fashion, consider burlap the next time you start a new project. Many of these plant based fibers contain rich, unique text and designs embedded in the material. Jute and hemp (often the woven material that makes up a burlap sack) are also naturally biodegradable. Check out our TEXTILES, WOOD AND RECLAIMED CRAFT section for more burlap projects like this one.


Leave a comment

Water tower (23)

“Perry Saucer”

Located on Standpipe Rd. in Perry, NY

Characteristics: Supported by 10+ massive legs, tank greater in diameter than height, metal beams create unique indentations on the underside of tank, light blue/grey in color, text (VILLAGE OF PERRY)

Details: Take State Rt. 20 west from Geneseo or east from Warsaw into Perry. Turn south onto Silver Lake Rd. Stay straight on Silver Lake Rd. for several miles past Sands Rd. and Oatka/Lake Rd. Turn left onto Standpipe Rd. as the tower will soon appear on the right situated between two homes and across from an open field.


Leave a comment

Water tower (21, 22)

“Leicester Tall Tank”

Located on Caledonia Rd. in Leicester, NY

Characteristics: Tall cylindrical tank, conical top, deep blue in color, resembles a farm silo, text (TOWN OF LEICESTER)

Details: Take 20A west from Geneseo into Leicester. In town 20A takes a sharp left (stay straight onto Canandaigua St.) Canandaigua St. turns into Caledonia Rd. and the tower will appear on your left at the next sharp right in the rd.

“Leicester Small Tank”

Located on Leicester Rd. (20A) in Leicester, NY

Characteristics: Small white tank, dome like top, frontal ladder facing street, blue text (VILLAGE OF LEICESTER)

Details: Take rt. 20A west from Geneseo into the center of Leicester (Main St.). Main St. (20A) becomes Leicester Rd. and curves sharply to the left (SW). The tank is viewable on the left atop an open pasture hill.


Leave a comment

Herbaceous Hare Hoagie Recipe (Vegetarian *Spicy*)

This past Saturday Megan and I ventured out into the Western New York woodlands to traipse the trails of Letchworth State Park. We faced three miles of meandering footpaths. Compressed earth twisted and intertwined with gnarled tree roots and bone-dry shale stream beds. After a bit of uncertainty and an access road detour, our path lead to  a luxurious lean-to. To much of our excitement the solitary shanty came adorned with a picnic bench, fire-pit, complementary stashed moonshine (garnished with a dead beetle), and garment hanging nails.

After returning home today with a renewed appreciation for fresh vegetables, gas stoves and running water I threw together this recipe for vegetarians and fans of spicy cuisine.

You will need:  

1/2 large carrot

1/3 green pepper

1/4 large zucchini

2 slices of bread ( I used homemade honey-wheat)

3 leaves of romaine lettuce

2 tbs clover honey

2 tbs hummus

2 tbs habanero salsa (or your favorite)

1 tbs cooking oil or coconut oil etc.

 —————————————————————————————————————————————————————————

Step 1: Slice all your veggies into sandwich-size slivers.

Step 2: Coat your pan in a light amount of oil and turn on to medium-high heat.

Step 3: Lay out your veggies and grill evenly on both sides. (Cutting slices of equal width will ensure even cooking)

Step 4: Drizzle honey over veggies and add cracked pepper/any additional seasonings.

Step5: Toast both pieces of bread within the last minutes of grilling.

Step 6: Remove bread from toaster and using a butter knife apply spicy salsa, hummus and lettuce to your bread.

Step 7: Carefully remove all veggies from the pan with a spatula and distribute/stack evenly on bread.

Step 8: Put sandwich on a plate, cover and eat.

—————————————————————————————————————————————————————————

*Note* Almond milk or a cold summer wheat beer goes great with this sandwich as both beverages quell the spice. Enjoy!